Section: Sales
Subject: Lead Log Procedure
Approved by: Tony Massey
Effective Date: 1 June 2014
Last Reviewed Date: 6 June 2014
Policy Owner: Vice President of Business Development
Policy #
WE ARE COMMITTED TO ONGOING TRAINING AND EMPLOYEE EDUCATION WHICH DEVELOP PRIDE, JOB ENRICHMENT, AND PERSONAL AND PROFESSIONAL GROWTH.
- The Lead Log is one of the most important Sales Management tools used by the General Manager and others responsible for growing our business to assist in evaluating, coaching, and improving the sales skills, performance, and productivity of all Sales Team Members. By properly utilizing the Lead Log, the General
- Manager can monitor and ensure prompt and/or same day response on leads, quality inspections, quality paperwork and proposals, complete and thorough presentations regarding problems, solutions, guarantees, and proper follow up on all leads.
- Correctly used, the Lead Log can facilitate communication between New Construction, Customer Care, and the Service Centers, to ensure that every lead (company generated as well as creatively developed) is reported, assigned, and followed up until it is Sold or Lost.
- The Lead Log will provide the Service Centers with an easier, more accurate way to report lead count and lead closure. It will assist the General Manager and Inspectors with researching old proposal information and more thorough follow-up.
- The General Manager’s ultimate goal is to utilize his Sales and Service Team Members to accomplish the following objectives:
- Close a minimum of 75% of all office leads.
- Generate a minimum of four (4) additional calls around every lead
- Propose multiple services per lead or appointment per company standards.
- Generate a minimum of 1.5 sales for every lead received
- Achieve a services-to-appointment sold ratio as described per company standards.
- Achieve sales budgets consistently.
- In accomplishing these goals, our Team Members will prosper, as well as make a beneficial contribution to the growth, security, and future opportunities of all Team Members, our Company, and our Customers.
Administration Relating to Preparing For Daily Check-Ins And Updating Information Daily #
- Every General Manager will conduct a “Daily Check-In Session” each morning per Sales P&P #1102, using the Daily Check-in Report and any other appropriate report or tool. While checking in each Inspector, the General Manager will update each pending lead by writing in the proposal amounts, callback dates, sales amounts, and notes in the space provided on the Daily Check-In Report. The General Manager will also note which leads have been “Sold,” “Lost” (along with reason), or are to be “pending” along with call-back date. Upon completion of check-in, the General Manager will return the updated Daily Check-In Report to the Office Manager so the new information can be added to the computer record in conjunction with the Office Manager’s morning posting, DOR, and data entry work.
- The Office Manager will update all of the Daily Check-in Report and Lead Log entries every day as part of their morning work and as additional leads are called in throughout the day. The updates, along with the new leads added during the day, will provide the General Manager the most up to date and accurate Lead Log to use for the next morning’s check-in.
- At the end of each day, print the Daily Check-in Report for each Inspector/Account Manager and place it with the Sales Appointment Logs on the General Manager’s desk for review and for conducting the daily accountability check-in session each morning.
Administration Relating to Activating, Inactivating, And Identifying Work Status For Inspectors And Other Team Members #
- All Sales and Service Team Members in a Service Center are to be activated in the Lead Log by the Office Manager upon being hired.
- When inputting Inspectors, the Office Manager should ensure that they are correctly coded as an “Inspector” and, likewise, should ensure that technicians, Service Managers, etc. are correctly coded as NOT being an Inspector.
- On days where the Inspector is in training or on vacation, the Office Manager is to correctly code this in the Lead Log. Failure to input this information will result in misleading information.
- When a Team Member leaves the Company or is transferred to another Service Center, the Office Manager is to inactivate the Team Member in the “Manage People” section of the Lead Log.
Administration Relating to Inbound Leads And Appointments #
- Answer and handle the phone and prospective Customer with a smile in your voice expressing interest, care, and concern for their problem and request. Take all lead information and enter it in the “Service Center Call Book.” Remember to ask the customer how they heard about our Company. NOTE: In addition to prospective and current customers calling in to schedule an inspection, Sales Team Members will be calling in their creatively developed sales appointments. The procedures for adding these leads are the same as described below.
- Determine territory for assignment of lead.
- Set an appointment with the customer. Enter customer information on the sales appointment log by entering the prospective customer’s name, address, and phone number(s). A separate page is to be maintained for each Sales Team Member per day.
- It is a primary duty of the Office Manager to reconcile the Lead Log, Appointment Log, Call Books, DOR, and recaps on a daily basis.
- It is a primary responsibility of the Office Manager to ensure that all leads are recorded in the Lead Log from the Service Center Call Books as they are received. From the Service Center Call Book, enter the customer information in the Lead Log in the Intranet. Click on the link for “Add Lead” and enter the prospective customer’s name, address, and phone number. Enter the customer’s email address and use the Notes field for Subdivision information, and other pertinent notes.
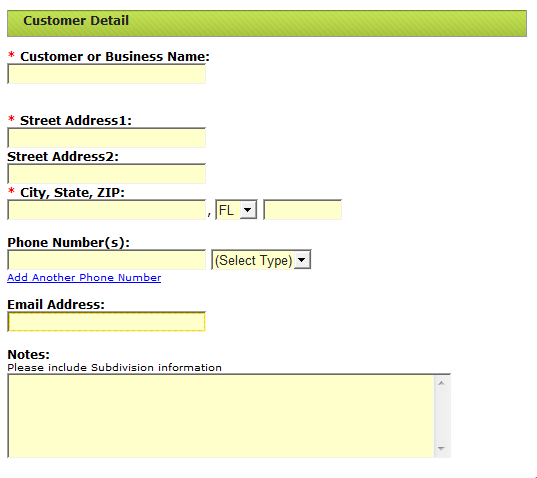
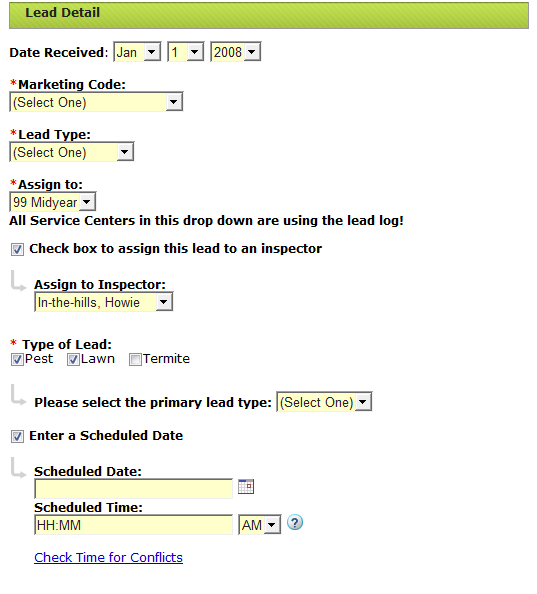
- The “Date Received” will default to the current day’s date. If you are adding leads received on a previous day’s date, change the date to reflect the actual date the lead was received.
- Every lead will reflect a Marketing Code to record the way our prospective customer heard about Massey Services. Use the drop-down menu to choose the source: Direct Mail, Radio, Yellow Pages, etc.
- Every lead should be designated as a Creative, Office, Service, New Construction, or Web Lead under the drop-down menu for Lead Source.
- Choose your service center name in the “Assign to:” field.
- Check the box to assign this lead to an Inspector, then use the drop-down menu to choose the name.
- Check the “Type of Lead” box to indicate Pest, Lawn, Termite, or more than one.
- Check the box to enter a scheduled date, then enter the scheduled date and time in the appropriate fields.
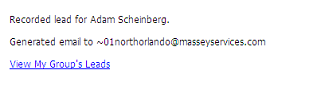
By clicking on the “Add Lead” button at the bottom of the page, you will get a message that tells you an email has been generated to all of the members of the service center’s group. The lead will now be added permanently to the Lead Log for follow up, and will show you this message:
- At the end of each day, print the Lead Log and place it with the Sales Appointment Logs and Daily Check-in Reports on the General Manager’s desk for review and for conducting the daily accountability check-in session each morning.
- Every General Manager will conduct a “Daily Check-In Session” each morning beginning at 8:00 a.m. per Sales P&P #1102, using the Daily Check-in Report, print-out of the computer generated Lead Log, and any other appropriate report or tool. While checking in each Inspector, the General Manager will update each pending lead by writing in the proposal amounts, callback dates, sales amounts, and notes in the space provided on the Daily Check-In Report. The General Manager will also note which leads have been “Sold,” “Lost,” or should be changed to “Not a Lead” status. Upon completion of check-in, the General Manager will return the updated Daily Check-In Report and Lead Log to the Office Manager so the new information can be added to the computer record in conjunction with the Office Manager’s morning posting, DOR, and data entry work.
- The Office Manager will update all of the Daily Check-in Report and Lead Log entries every day as part of their morning work and as additional leads are called in throughout the day. The updates, along with the new leads added during the day, will provide the General Manager the most up to date and accurate Lead Log to use for the next morning’s check-in. Update the entries by clicking on the link to the “Open Leads” in the top right of the screen. This will bring you to a list of all of the prospective customers with open leads. You will locate each prospect’s name in the list and open their information page by clicking once on their name. From here you will be able to add proposal information, show leads as Sold, Lost, No Lead, or Delivered, enter sales values, modify notes, and add call back dates.
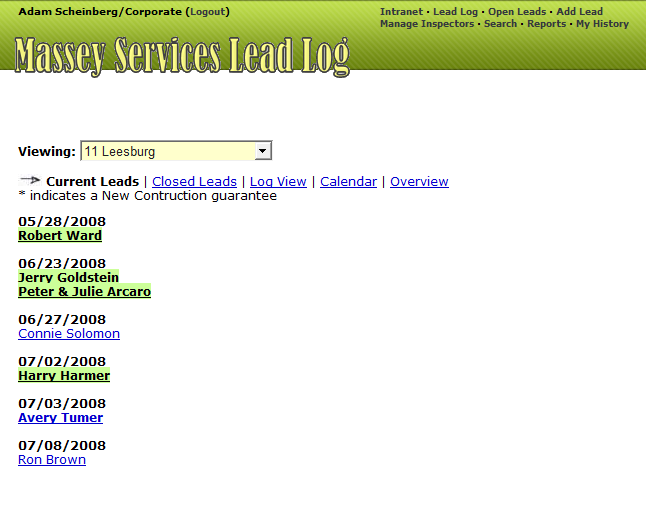
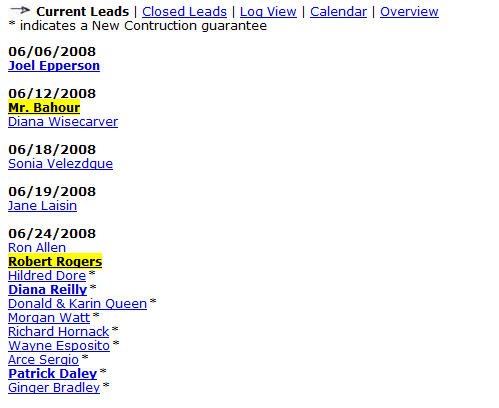
Note that leads printed in bold blue text have never been opened or acknowledged.
- The prospective customer’s page will open and give you the following action options to update the record:
- Lead Status
- Add Values
- Add Notes
- Scheduled Time
- Add Callback Date
- Change Contact Name
- Reassign
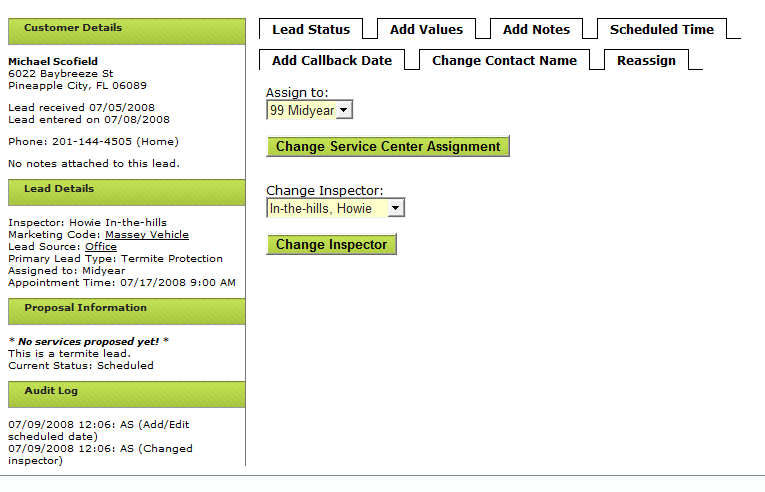
The “Customer Details” on the left side of the screen shows the Name, Address, and Phone Number(s) of the Lead, along with the Notes field. If the date the lead was entered is different from the date the lead was received, both dates will be displayed. “Lead Details” shows the Inspector assigned to the lead, the Marketing Code, Lead Source, Primary Lead Type, and Scheduled Date. The Proposal Information is available in the third section, and a complete Audit Log is available in the final section.
Lead Status: Use this tab to open a drop-down menu. From there, you will be able to adjust the lead status. Each lead can have one of seven statuses. With each status, some additional information may be required.
- A “new lead” is a lead with no additional information, where we have yet to contact the prospect
- After we have made contact and scheduled a meeting, the lead is “scheduled.” Many leads will start at this level. If you select this status, you will need to enter a scheduled date.
- When we have proposed our services and entered the data into the Lead Log, the lead is “proposed.” If you select this status, you will need to enter a callback date.
- When they buy our services, the lead is “sold.” If you select this status, you will need to reconfirm the primary lead type.
- When a prospect elects not to use our services, the lead is “lost.” If you select this status, you will need to select a reason why the lead was lost.
- On the rare occasion that a lead turns out not to be a lead, we mark it “No lead.” If you select this status, you will need to type a reason why the customer was not a lead.
- Lastly, if given a New Construction guarantee, you can mark it as “Delivered.” ONLY New Construction leads can be marked “Delivered.”
You will have one additional option in the dropdown, “Mark as Duplicate.” In the event a lead is entered into the Lead Log twice, you can mark one of the leads a duplicate. By following the onscreen instructions, you will need to select the lead that the current lead is duplicating.
Add Values: Click on this tab to record the proposals we have offered to this prospect, and to add “Sold Values” to leads we have sold. A new window will open and show all the possible services we can propose. Select the service type of the proposal and then type the prices into the appropriate fields:
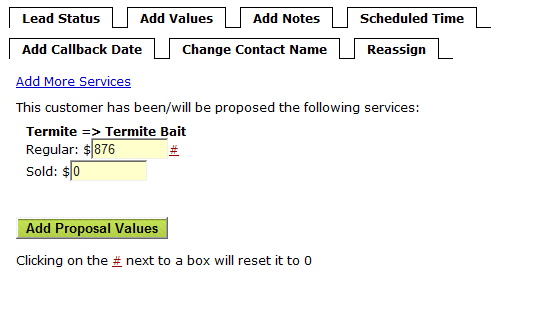
If you make a mistake, you can click on the # sign next to the value to reset the value to 0.
You can add multiple proposals to the account by clicking the links to add.
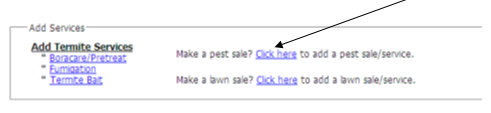
A new window will open showing you a list of links to choose additional service names.

Click on the link to open a window and fill in the prices of the service proposed:
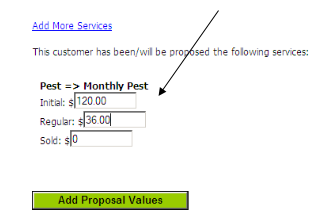
If the lead was sold, enter the annual sales value (or total sale value, if it is a one-time service) in the “Sold” field. If you would like to add additional proposals to the lead at this time, you can click on the “Add More Services” link. If the lead was “Sold,” add the annual value of the sale in the “Sold” field.
Add Notes: Click on the “Add Notes” tab if you want to add comments to the lead. A new field will open and you can type the note into the space.
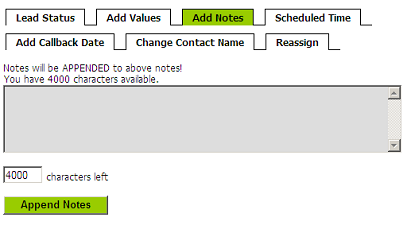
Click on “Append Notes” to save the changes.
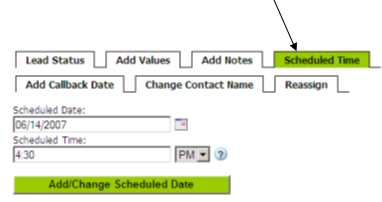
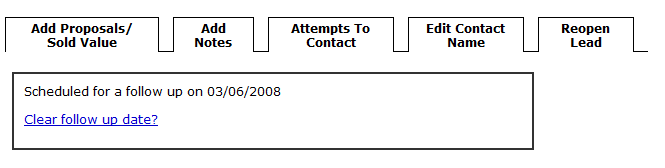
Scheduled Time: Click on this tab if you would like to add or change the scheduled date or time of this lead appointment:
Add Callback Date: Click on this tab if you’d like to add a Callback date on a proposal.
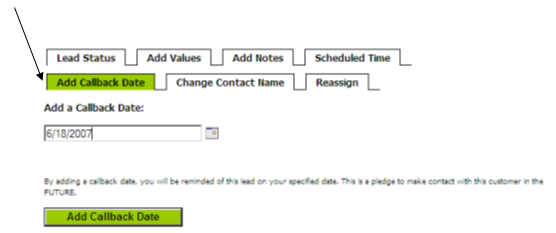
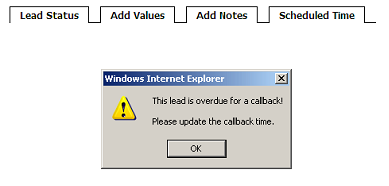
Click on the Add Callback Date to add it to the Lead. This will help you manage the callbacks. Each day when you open the “Open Leads” you will see the leads overdue for a callback highlighted in yellow. Leads due for a callback today will be highlighted green.
When you open a lead by clicking on the customer’s name, you’ll get a pop-up window if your Inspector is late making the callback:
Change Contact Name: Click on this tab if you would like to edit the name on the lead:
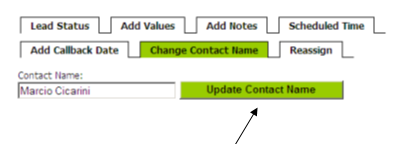
Complete the change by clicking the “Update Contact Name” button.
Reassign: If you would like to reassign the lead to a different Service Center or a different Inspector, choose the tab labeled “Reassign”:
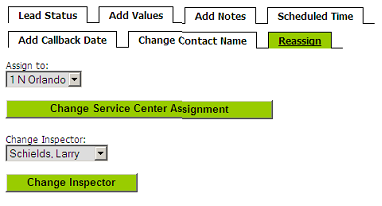
Note that once a lead has reached “Proposed” status, you will no longer be able to assign it to another service center.
Use the dropdown menus to change the Service Center assignment or the Inspector assignment. Click on the green button below the change to update the Lead Log.
The “Manage Inspectors” link at the top of the page will allow you to see a list of the Inspectors assigned to your Service Center, change their active or inactive status, and add a new Inspector:

- Clicking on the “Toggle” () link will let you change status from Active to Inactive or back. If an Inspector has open leads, those leads will revert back to Unassigned status. If you would like to add a new Inspector to your service center, choose the link for “Add new inspector” and add the Inspector’s name to your list.
- Please note that if an Inspector is transferring from another Service Center, they should edit the Inspector and change his/her service center. You should NOT create a duplicate. This allows us to keep an accurate Inspector history.
- You should never blank out an Inspector’s name or change the name to someone else. If you do this, we will lose a permanent history and your historical reports will be wrong.
There is a search feature that will help you easily find a lead quickly, rather than scrolling through lists of past leads:

In the “Search For” field, add the customer’s name, or the name of a street, city, phone number or text that will help you find the lead you want to open. You can use a city name, a first or last name, etc. If, for example, you type the word “Orange,” you’ll get a list of leads from Orange City, Port Orange, Orange Avenue, Bill’s Orange Emporium, etc.
From the menu bar at the top of the page, you can see the entire Lead Log for your service center by choosing “Lead Log.” The page will appear by Inspector, by date:
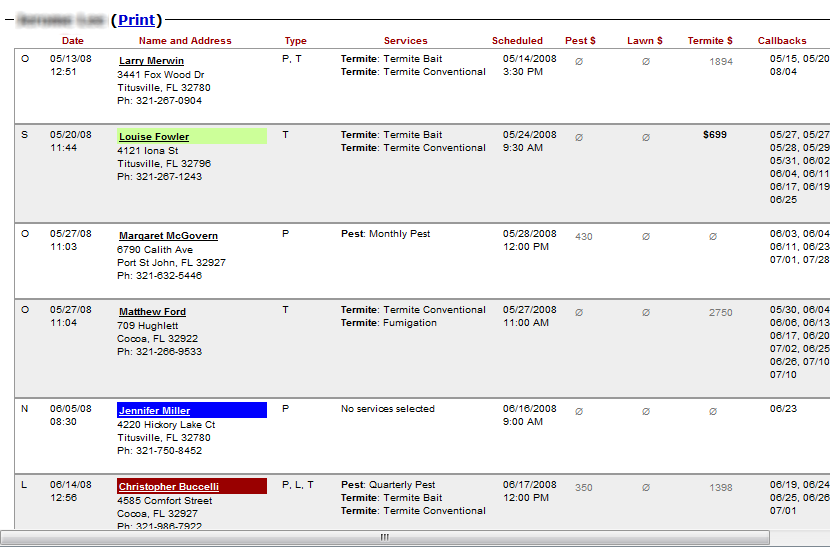
Leads highlighted in Green are “Sold.” Leads highlighted in Blue were recorded as “Not a Lead.” Leads highlighted in Red are “Lost.” New Construction guarantees marked “Delivered” and leads marked “Duplicate” will never show on your Lead Log.
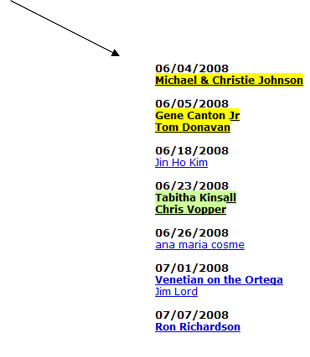
Choosing the option in the menu for “Open Lead List” will bring up a list of open leads. Leads that are highlighted in yellow are scheduled for a callback on the current day’s date:
When you close a lead, you will be given the opportunity to add a “follow-up date.” These leads will remain closed, but will give you the option of adding a date in the future to follow up with the customer. Leads on your follow up list will show on the right hand side of your “Open Leads” list.
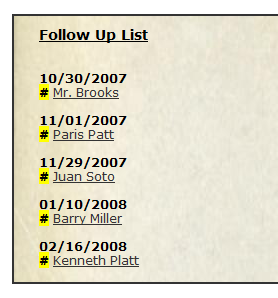
Leads on your “follow-up list” will not show on your Lead Log or anywhere else. They are closed leads that have been flagged for your Service Center, and will not be visible in any other place. When you click on a follow-up lead, you will see a box with an option to remove the follow-up date:
You can always add additional notes to a closed lead and reopen it if something changes