Section: Route Organization
Subject: Routing, Scheduling, & Assigning Work Using Service Pro Web Mapping
Approved by:
Effective Date: 1 March 2005
Last Reviewed Date: 1 March 2005
Policy Owner:
Policy #
One of the primary duties of the Service Manager is to organize and assign a full day’s work, every day, to every Team Member under their supervision. The Service Manager should organize their own schedule to allow for daily review, rescheduling and fine-tuning of service routes. The goal is to maximize every Team Member’s productivity.
All Team Members should be assigned their next day’s work during the afternoon check-in session in accordance with minimum company productivity standards. This daily assignment process will ensure that all customers are serviced on time and that the individual Team Member’s level of productivity will meet or exceed the minimal level.
There are three steps to organizing and scheduling work. They are:
- Geocoding Accounts
- Route Organization
- Scheduling the Route
Geocoding Accounts #
Geocoding is the process of assigning global positioning satellite coordinates to accounts. Geocodes are represented as latitude and longitude coordinates that belong to the account location. These latitudes and longitudes are located in Service Pro in the “Site Details” screen. Visual Route, which is our scheduling software, uses these geocodes to accurately plot the services on a map. In order for Visual Route to plot every scheduled service, you must ensure that all accounts are assigned geocodes.
Visual Route will identify those accounts without assigned or incorrect geocodes and correct missing geocodes when the search data is accessed. Visual Route will then identify all accounts that Google was not able to locate to rooftop accuracy. A prompt will load noting the number of addresses corrected using the Visual Route database. Once in Visual Route, the system will identify individual addresses that are not automatically corrected. At this point they can be corrected by opening the service way point and clicking fix address to the right of the zip code in the address line. Save all newly geocoded accounts by selecting the Save button before exiting the program. At this time, run the Ungeocoded Accounts to verify all account have correct geocodes.
Route Organization #
Route organization is the process by which accounts are grouped into individual service routes. This
software is used to:
- Create a new route from the existing routes.
- Clean up an existing route.
Fully productive service routes are created by taking into account topographic and man-made boundaries. The system used to define these routes is the Visual Route software accessed from Service Pro.
To start the routing process:
1. Log into ServicePro and from the top tool bar select Routing (Fig. 1)

2. Click Service/Routes by Date
3. Click Assign routes

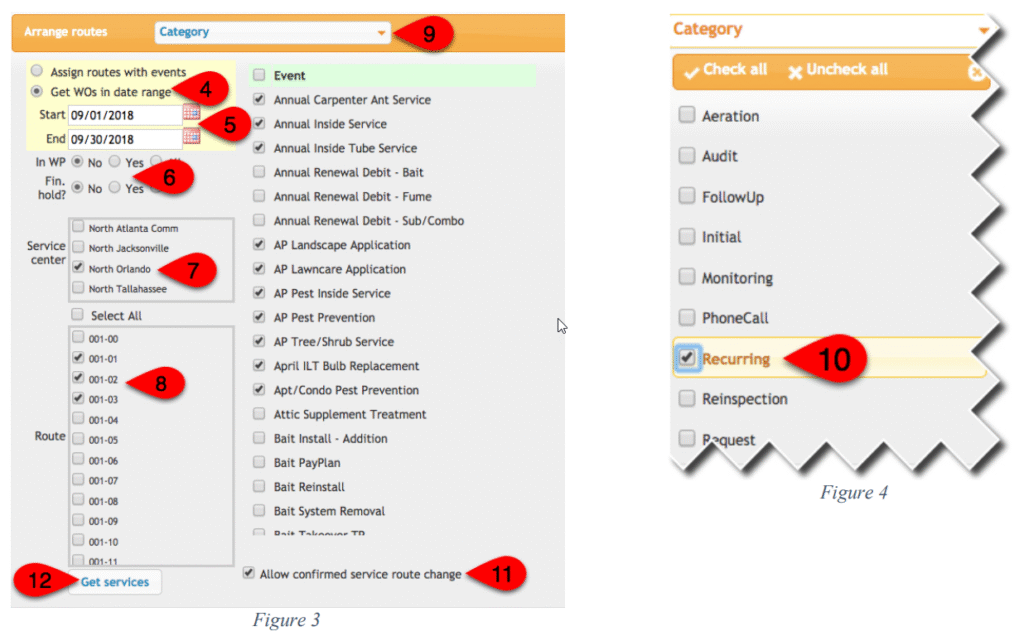
4. Select Get WOs by date range.
5. Enter the start and end dates.
6. Select IN WP =no and Financial Hold=No.
7. Select the Service Center.
8. Select the routes you want to evaluate. They are listed as Service Center number – route number.
For example, Route 30 in GreenUP Orange (02) will be listed as 002-30.
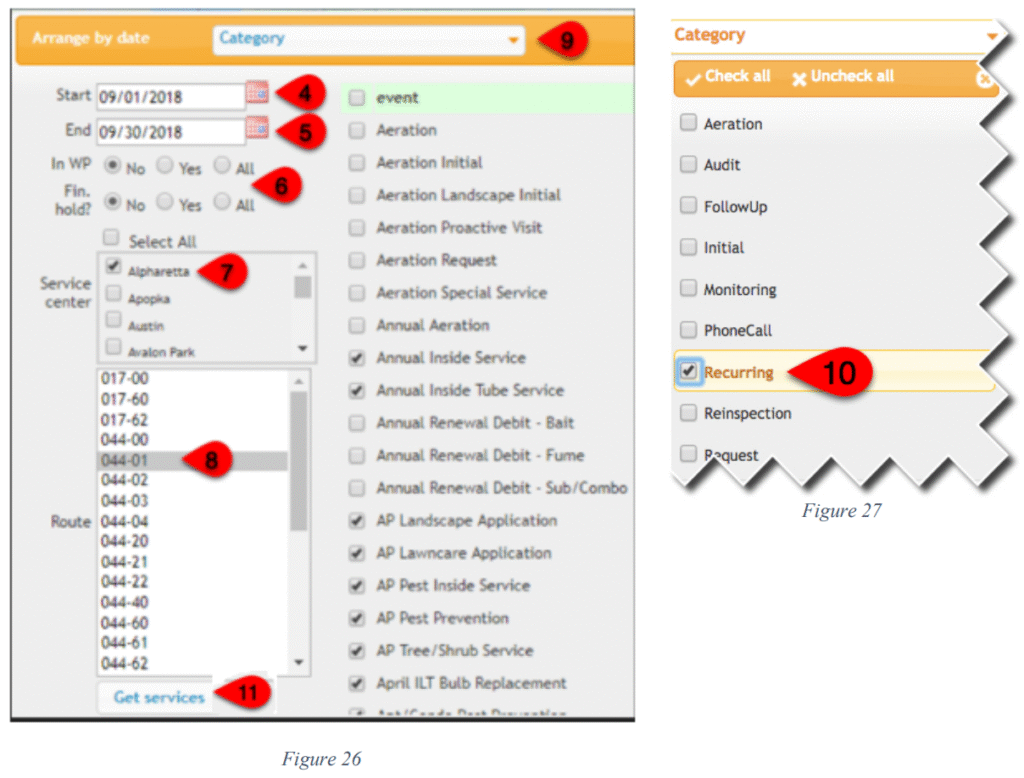
9. To select the categories to work with, click on “Category.”
10. Click to checkmark (Fig. 4) each service type that is appropriate for the routes you are evaluating, monitoring for bait monitoring, or the recurring option which will load all recurring services. After the desired services have been selected, click the x or off screen to proceed. Additionally,you may filter for specific event by only selecting the checkbox by the desired event(s).
11. If you want to be able to adjust confirmed appointments, check the box at the bottom of the page “Allow confirmed service route change”. If you do not want to change confirmed appointments, leave unchecked.
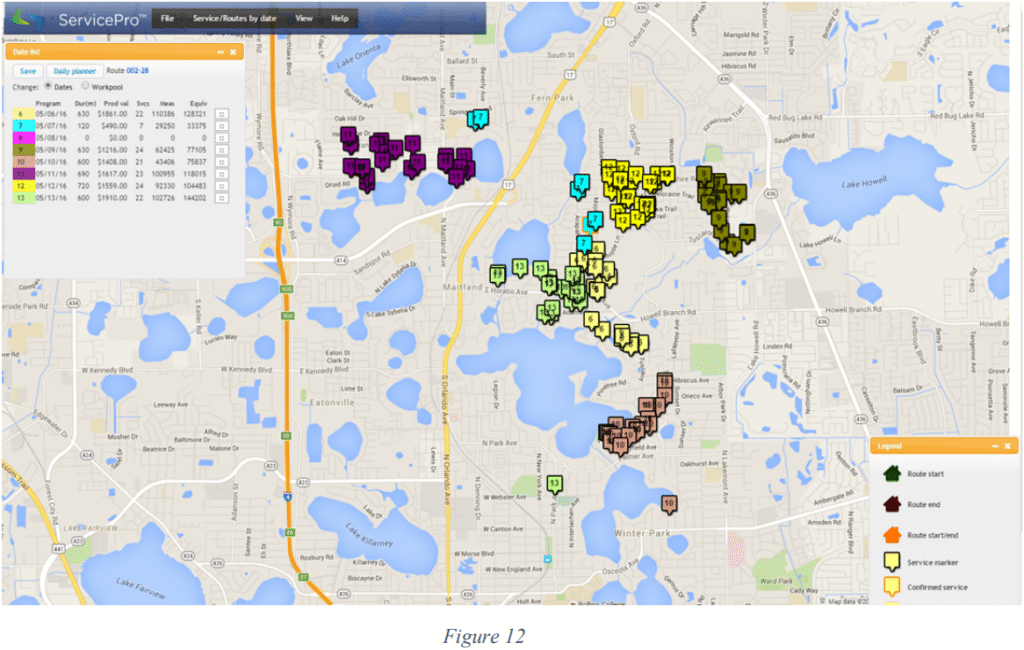
12. Click “Get Services” button at the bottom. This will bring up a map that contains the accounts for the selected services. The map will load with the way points numbered and colored. Each route will be denoted by different colored way points.
To zoom in or out of an area on the map, use the scroll function on the mouse.

Chaning Accounts from One Route to Another #
1. To change an account(s) from one route to another, select the route you want to move the services to on the “Route List” (Fig. 6) located on the left of the screen.
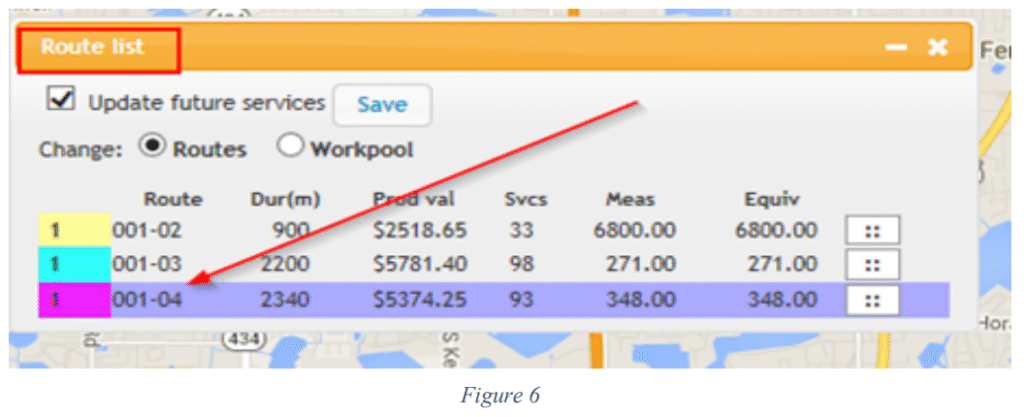
2. Select a range of way points to change the route: Hold down the Shift key and drag the mouse around the area to remap. This draws a box around the way points you wish to change. The points inside the box will automatically change to the selected route and the points change color. If you wish to change a single service, tap the waypoint to open and click the colored waypoint in the bottom of the box to change it to the new route.
3. Check update future services and click “save” to save these changes (under file or above the route list on the left hand side below the orange bar) (Fig. 6).
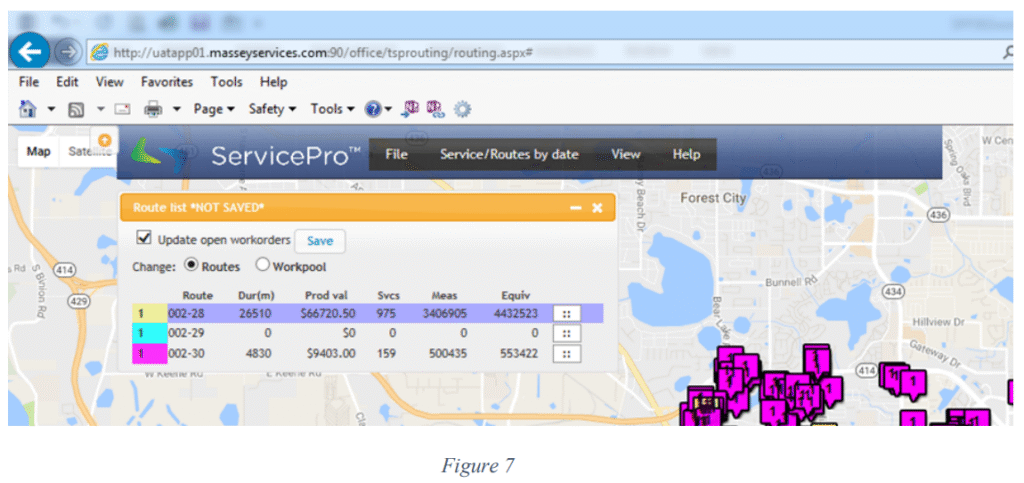
The assigned revenue to each route updates in real time as you change the assignments to the routes in the route list. This allows the user to determine if the changes made to the routes meet company productivity standards. If the assignment has not been saved *NOT SAVED* will show to the right of the Route List header (Fig. 7).
Scheduling the Route #
Scheduling is the process of efficiently organizing each day’s work for a route by minimizing drive time between stops. The Service Manager must organize each day to achieve the maximum productivity for each Team Member.
The first step in scheduling is to print the current “Production to do in detail by route by schedule date with price” report from the Web reports. This will be used as a reference to compare any changes made during the process of scheduling.
To start the routing process:
1. Log into ServicePro and from the top tool bar select Routing.

2. Click Service/Routes by Date
3. Click Arrange svcs by date

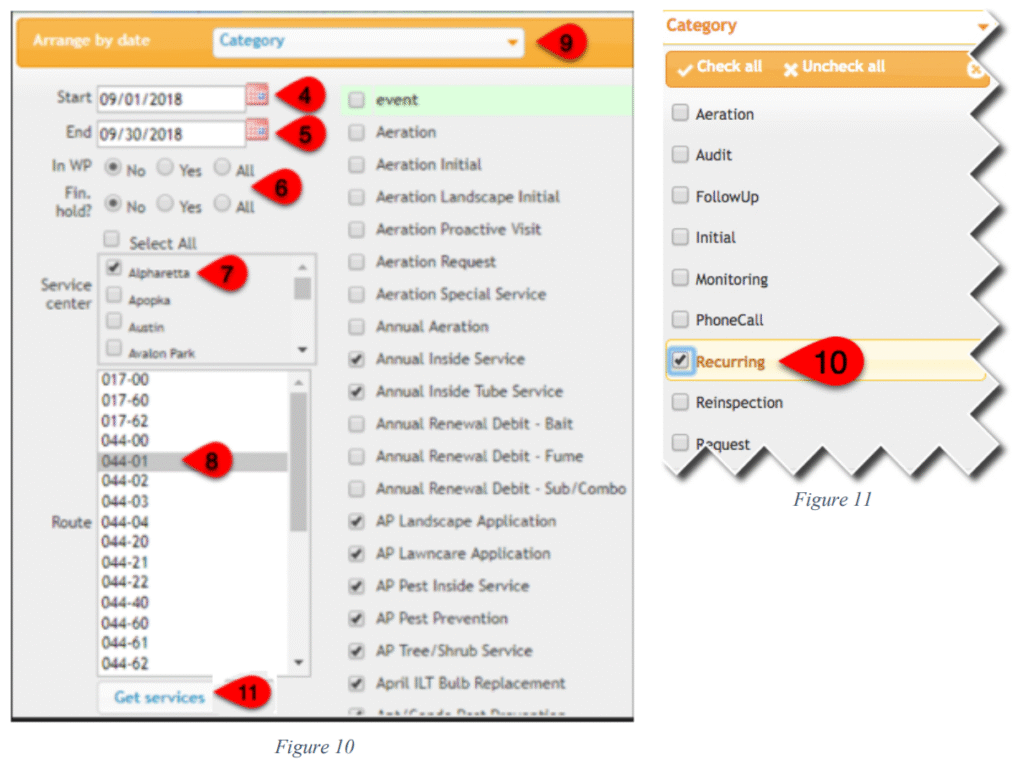
4. Select the start date.
5. Select the end date.
6. Select IN WP =no and Financial Hold=No.
7. Select the Service Center.
8. Select the route you want to evaluate. They are listed as Service Center number – route number. For example, Route 30 in GreenUP Orange (02) will be listed as 02-30. You may only select one route at a time.
9. To select the categories to work with, click on “Category.”
10. Click to checkmark (Fig. 11) each service type that is appropriate for the routes you are evaluating, monitoring for bait monitoring, or the recurring option which will load all recurring or the recurring option which will load all recurring services. After the desired services have been selected, click the x or off screen to proceed. Additionally, you may filter for a specific event by only selecting the checkbox by the desired event(s).
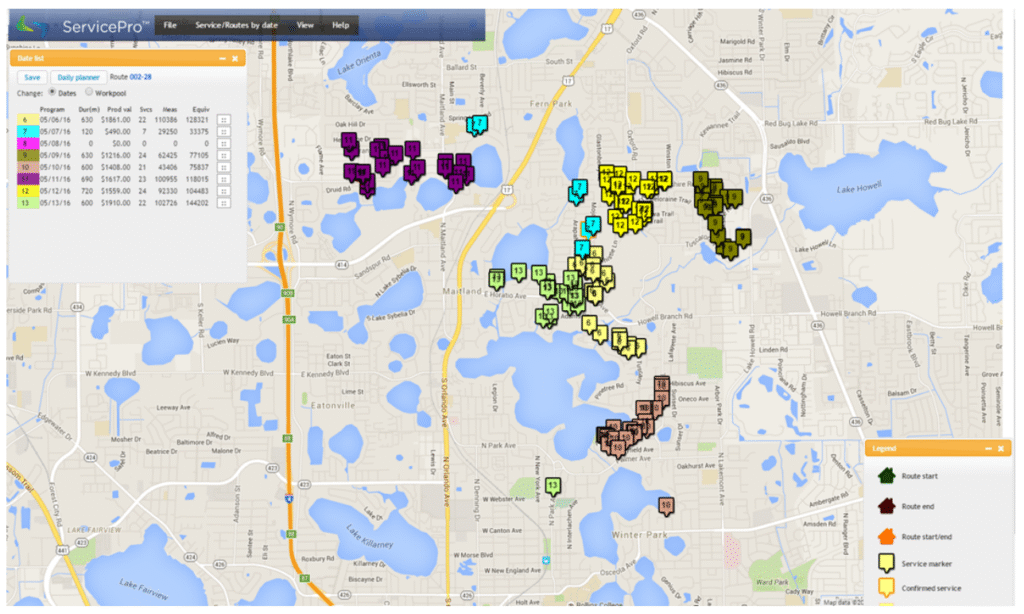
11. Click “Get Services.” This will bring up a map that contains the accounts for the selected services in the route. The map will load with the way points numbered and colored. Each scheduled day will be denoted by different colored way points and corresponding dates. Accounts scheduled for the same day or multiple accounts Geocoded for the same address will be represented as a way point with a black and red outline (Fig. 13). Click on the way point to verify that the services are for the same account, and therefore the same address. Verify the services are scheduled to be done on the same day by checking the workorder date in the information box. If the way point shows different accounts, the addresses need to be corrected. This is done by opening the individual service way point and clicking fix address to the right of the zip code in the address line. Confirmed appointments are designated by an orange border. The dates for confirmed appointments cannot be changed through Visual Route. To zoom in or out of an area on the map, use the scroll function on the mouse.

Once the map and way points are loaded:
- Use this map to group individual accounts on the same day to maximize productivity and minimize drive time between services.
- Do not move an account more than 5 days beyond its current date. However, an account can be moved more than 5 days forward if the customer is made aware and has given permission to do so.
- Bait monitoring services can only be moved +/- 5 days from their previous schedule date according to current label requirements.
Changing Service Dates #
1. To change a service/services from one date to another, select the date you want to move the services to on the “Date List” (Fig. 14) located on the left of the screen.

2. Select a range of way points to change the date: Hold down the Shift key and drag the mouse around the services to be rescheduled. This draws a box around the way points you wish to change. The points inside the box will automatically change to the selected date and the points change color.
3. A dialog box will pop up asking if you would like to change the current service or future services. (Fig. 15) Selected service will update only the earliest service on pushpin. Future services will update earliest service on pushpin and all future services. Choose the appropriate option for the scheduling session. You will have to complete this step for each service that was moved.

4. To change Individual Service Dates Click on the way point you wish to change. On the Date List, select the new date by selecting the row with the new date. Go back to the way point account information and click the date field at the bottom. The user is prompted with the option to change only this service or all future services.
5. Click “save” to save these changes (under file or above the date list on the left hand side below the orange bar) (Fig. 16).

The assigned revenue, measurements, and measurement equivalents update to each date updates in real time as you change the assignments to the routed dates in the date list. This allows the user to determine if the changes made to the routes/dates meet company productivity standards. If the assignment has not been saved *NOT SAVED* will show to the right of the Route List header (Fig. 17).

Optimizing the Route #
Once Services are mapped, you can then use the Daily Planner to view an appointment, fix an address, or reschedule a service. The Daily Planner allows you to review the appointments on a day number selected. You can optimize the routes and view confirmed appointments.
1. After the routing is complete select a date from the date list then click “Daily Planner” option next to the save button in the “Date List” (Fig. 18).

2. The route for the selected date will pop up to the right of the date list box. (Fig. 19) The pop up will give you four options Optimize route, Calculate route, Save, and Print.

3. To optimize the route click the optimize route option (Fig. 19, in previous step) and the appointments will arrange in the optimal driving order as determined by the closest way point to the assigned service center. If there is a better way to run the route, the appointments can be clicked on and dragged. Hit Calculate Route to estimate the drive time miles and time.
4. Scrolling down displays a list of directions for each stop including estimated drive time and distance (Fig. 20).

5. Click to save the changes
6. Print the report for the specialist. The Daily Planner will display a list of stops and directions from stop to stop for the day optimized. PLEASE NOTE: The appointments will be shown in stop order in the handhelds when the handhelds are synced.
Optimizing a route with confirmed time appointments requires additional steps #
1. Confirmed stops will show in red bold numbers on the daily planner route optimizer with a box before the account number (Fig. 21).
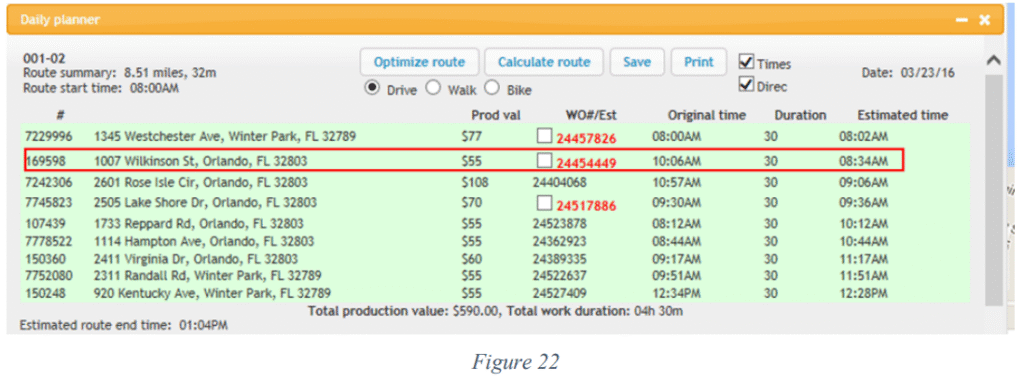
2. If you click Optimize Route without checking the box, the services will route IGNORING the confirmed appointment time. For example a 10:06AM confirmed time will still be there, but the optimizer tells the user that for the route to be optimized, 8:34AM is the best time for this appointment (Fig. 22).
3. If you wish to keep the new time, check the box next to the confirmed appointment and click Save.
This will un confirm the appointment and update the time to the optimized time. If you need to move the appointment closer to the confirmed time, click and drag the appointment and click Calculate (Fig. 23).

- This will recalculate and display the new stop times.
- The user can continue to do this step until it’s in the desired confirmed appointment range. If the appointment optimizes to the exact time scheduled, then the appointment will appear in green.
- Click save to save the changes. PLEASE NOTE: The appointments will be shown in stop order in the handhelds when the handhelds are synced.
Assigning Work #
Work is to be assigned daily during check in. By completing the following steps, the Service Manager will be able to efficiently organize and assign each day’s work.
For service centers that are not Mobile Printing:
Twice a week the Customer Service Specialist or Office Manager will print Service Reports in the following manner:
Tuesday
Service Reports are printed for Wednesday, Thursday and Friday
Thursday
Service Reports are printed for Saturday, Sunday, Monday and Tuesday
The Service Reports will be given to the Service Manager.
For service centers that are Mobile Printing:
Service Reports do not need to be printed. The iPad/handheld carries the information needed to completethe service and communicate the work order to the customer.
At approximately 3:00PM, after the previous day’s work has been posted, the Service Manager will log into Service Pro and open Visual Route.
1. Log into ServicePro and from the top tool bar select Routing.

2. Click Service/Routes by Date
3. Click Arrange svcs by date

4. Select the Start Date.
5. Select the End Date. This date range should be the 1st through the next Saturday’s date. This will bring up all accounts scheduled and not completed through the next Saturday.
6. Select IN WP =no and Financial Hold=No.
7. Select the Service Center.
8. Select the route you want to evaluate. They are listed as Service Center number – route number. For example, Route 30 in GreenUP Orange (02) will be listed as 002-30. You may only select one route at a time.
9. To select the categories to work with, click on “Category.”
10. Click to checkmark (Fig. 27) each service type that is appropriate for the routes you are evaluating, monitoring for bait monitoring, or the recurring option which will load all recurring services. After the desired services have been selected, click the x or off screen to proceed. Additionally, you may filter for specific event by only selecting the desired events.
- If you want to view all services regardless of category, click in the Event box at the top of the event list. This will select all events at the same time. This is especially useful when rescheduling services that were not completed on their regularly scheduled date.
11. Click “Get Services.” This will bring up a map that contains all of the accounts for the selected services in the route. The map will load with the way points numbered and colored. Each scheduled day will be denoted by different colored way points and corresponding dates. Accounts scheduled for the same day or multiple accounts Geocoded for the same address will be represented as a way point with a black and red outline. Correct this by opening the individual service way point and clicking fix address to the right of the zip code in the address line.
Any previously not serviced accounts should be rescheduled to the next day if it is logistically possible. If not, assign the account to another day that week. No account should go more than five days beyond the originally scheduled service day. This may require not serviced accounts to be caught up on Saturday. When done, you should have no accounts scheduled prior to today’s date.
- After you have evaluated and adjusted the next day’s work, optimize that day in the daily planner feature for all assigned routes for each specialist.
- After the routes have been evaluated, adjusted and optimized, you can click “Save”.
- Print the report for the specialist. The Daily Planner will display a list of stops and directions from stop to stop for the day optimized. PLEASE NOTE: The appointments will be shown in stop order in the handhelds when the handhelds are synced.
- Print out the Coversheets/Daily Assigned Worksheets for the next day’s work. The optimization process will ensure that the sequence of the stops will be in the best order to perform service.
- When assigning the work to the Specialist, match up the invoices with the “Daily Worksheet”, forms, and the optimized route/maps. This is a complete work packet ready to be assigned during today’s check in.
- The optimized route information is to be used during the afternoon check in session in comparison to the order of the completed work. Identify any misses and address this with the specialist as needed to maintain optimum routing efficiencies.