Section: Route Organization
Subject: Routing, Scheduling, and Assigning Work
Approved by: Adam Jones
Effective Date: 1 March 2005
Last Reviewed Date: 1 March 2005
Policy Owner:
Policy #
One of the primary duties of the Service Manager is to organize and assign a full day’s work, every day, to every Team Member under their supervision. The Service Manager should organize their own schedule to allow for daily review, rescheduling and fine-tuning of service routes. The goal is to maximize every Team Member’s productivity.
All Team Members should be assigned their next days work on a daily basis during the afternoon check-in session in accordance with minimum company productivity standards. This daily assignment process will ensure that all customers are serviced on time and that the individual Team Member’s level of productivity will meet or exceed the minimal level.
There are three steps to organizing and scheduling work. They are:
- Geocoding and Gridding Accounts
- Route Organization
- Scheduling the Route
GEOCODING ACCOUNTS #
Geocoding is the process of assigning global positioning satellite coordinates to accounts. Geocodes are represented as latitude and longitude coordinates that belong to the account location. These latitudes and longitudes are located in Service Pro in the “Details” screen. Visual Route, which is our scheduling software, uses these geocodes to accurately plot the services on a map. In order for Visual Route to plot every scheduled service, you must ensure that all accounts are assigned geocodes.
To identify those accounts without assigned geocodes, print the “Ungeocoded Account Report” located in SERVICE PRO WEB REPORTS.
Reasons for accounts not having geocodes:
- The most current map is not up to date due to construction of new neighborhoods.
- The spelling of the street is not exactly the same as it is on the map. If the spelling doesn’t match precisely, the computer will not match up the location. For example, the street is Pinebrook Ct, not Pine Brook Ct.
- The street prefix or suffix doesn’t match. Be sure the suffixes such as street, court or drive are accurate. Again if this differs from the map, the account will not be assigned a geocode.
Once you have identified those accounts without geocodes, there are three methods to locate the geocode and update the account information.
- Plot the account with a GPS device.
- Match the account to other accounts using “Street Search” in Service Pro.
- Use the Geocode Utility to manually plot the geocode.
Plotting Using a GPS Device #
This method involves driving to the uncoded service location and utilizing a Global Positioning System (GPS) device. This device will generate a latitude and longitude for the location. Update the customer’s information in Service Pro by adding the latitude and longitude to the “Details” screen.
Matching the account using the “Street Search” method #
1. In ServicePro, perform a “Street Search” on the IntelliSearch page. Enter the zip code for the ungeocoded account and then the street name (NOTE: do not include house numbers). Click on “Search Now”.

2. If there are any accounts with the same zip and street name, they will be listed.
3. Double click on an account and click on the “Details” tab, Figure 2
4. If there is a latitude and longitude code, record the numbers and then enter them into the same field for the ungeocoded account.
5. If there is not a latitude and longitude code, click on “Main Menu” and select the next account.
6. Repeat Steps 1-5 for each ungeocoded account.

Using the Geocode Utility to manually plot geocodes #

1. Double click the icon.
2. Log in using your Service Pro username and password.
After logging in you will get a “Loading Data – Please Wait…” message. Wait until it goes away.
A message may pop up that says “No Records Available to Display”. Click “OK”
3. Click the drop down arrow for the branch and select “Corporate” as most non-geocoded accounts will be listed there.
4. The Geocoding screen will appear.

5. Locate and select your ungeocoded accounts one at a time by highlighting it and then clicking “Send to map” (fig 3, C). This will result in one of the following:
If the computer can match a location, it will automatically send the account to the map. The account will be represented by a red dot. Review this location to verify that it is correct.

If the computer cannot identify where to place the account, a window will appear, with a list of possible matches for the selected account
This list will include all addresses that are spelled similarly as well as a default listing of the account zip code.
Check this list for your account’s address. If your address is listed, click the account to select it and then click “OK”; this will place a red dot on the map.
If your address is not listed, click on the zip code and then “OK”. This will place a red dot in the geographic center of the zip code that must be moved to the desired location on the map
6. To move an account to a desired location:Click once on the red dot. This will place a box around the red dot.
Click and hold down the left mouse button while dragging the dot to the correct location. Release the left mouse button when the dot is at the desired location.
If the correct location is not visible on the map, right click on the map and a zoom option will be available.
Zoom out as needed to include both the red dot as well as the correct location.
Drag the red dot close to the correct location then zoom in as needed to precisely place the dot on the correct location
7. After you have placed the red dot on the right place, double click it to set it. Click the “Update Account” button (fig 3, F) in the lower left-hand corner. This will input the correct geocode in the Service Pro database.
8. Repeat Steps 6-8 until all ungeocoded accounts are geocoded.
9. If after searching you cannot find a missing account in the “Corporate” list of accounts, go back to the “Branch” selection field (fig 3, A) and choose another service center. Typically, the missing accounts will be located in either your service center or under NCD builder. After locating the missing account, go back to step 6 and plot the account.
ROUTE ORGANIZATION #
Route organization is the process by which accounts are grouped into individual service routes.
This software is used to:
- Create a new route from the existing routes.
- Clean up an existing route.
- Move a customer from one route to another.
Fully productive service routes are created by taking into account topographic and man made boundaries. The system used to define these routes is the Visual Route software.
*DO NOT PROCEED WITH THESE STEPS UNTIL ALL ACCOUNTS ARE GEOCODED
To Start the Routing Process: From Citrix #
1. Open Service Pro. Service Pro must be open while using the mapping software to ensure proper function.
2. Open the Visual Route mapping program and log in by entering your Service Pro username and password. The Mapping screen will appear, which is your working template for routing.

3. Select “Route My Accounts” (fig 5, B). This is in the upper left hand corner of the screen.
4. Select the routes you want to evaluate. These routes are listed on the left side of the screen (fig 5, D). They are listed as Service Center number – route number. For example, Route 30 in GreenUP Orange (02) will be listed as 02-30. You may plot up to 2,000 accounts at one time.

5. Click on “Select Services” (fig 5, F). The select services window, figure 6, will appear. Click to checkmark each service type that is appropriate for the routes you are evaluating. Refer to Appendix A for appropriate service types for each route type. After all services have been selected, click “Close” to proceed.
6. Click on “Additional Options” (fig 5, G). The Additional Options window will appear.
In the “Service Status” field (fig 7, A) choose “Active”.
When routing accounts, select a time frame (fig 7, B).
Check the box “Only include accounts for whom…in this date range”.
- Click on the arrow in the “From” box. A calendar will appear. Highlight the first day of the month being routed.
- Click on the “To” box. Another calendar will appear, highlight the last day of the same month for the following year. This should include thirteen months, for example 9/1/04 through 9/30/05.
Click on the “Close” link to close the additional options box.

7. Click on “Create Map” (fig 5, H). This will bring up a map that contains all of the accounts for the selected services. Each route will be denoted by different colored push pins.

To zoom in or out of an area, use the “Navigate” button . Draw a box around the area you want to zoom in on and click inside of it. You can also use the zoom in/out buttons to move around the screen. These are located in the toolbar (fig 8, A) at the top of the screen.
To change an account from one route to another, use the “Select” button located on the menu toolbar (fig 8, A). Select the route you want to change the account to from the list of available routes listed at the left of the screen. Draw a box around the push pins you wish to change by clicking an area on the screen and dragging the cursor across the push pins while holding the left mouse button down. Release the left mouse button once the box encompasses the pins you wish to change. The pins inside the box will automatically change to the selected route. Once the pins change color select the navigate button.
Special Note:
Always select the navigate button before making any further changes. A common mistake is to inadvertently change the pin’s route color while attempting to zoom in on another area of the map. There is no undo function in Mapping.
8. To determine if the changes you made to the routes meet company productivity standards:
- Save your changes by clicking “These are permanent changes” (fig 8, E) and click “Save changes” (fig 8, F).
- Run a “Production to do in detail by route by schedule date with price” report using the Service Pro Web Reports. From this report, verify that all production standards for your business segment are met.
- If the routes are not to company standard, go back into visual route and continue to adjust the routes until they are at standard
SCHEDULING THE ROUTE #
Scheduling is the process of efficiently organizing each day’s work for a route by minimizing drive time between stops. The Service Manager must organize each day to achieve the maximum productivity for each Team Member.
The first step in scheduling is to print the current “Production to do in detail by route by schedule date with price” report from the Web reports. This will be used as a reference to compare any changes made during the process of scheduling.
The process of scheduling the work takes place in Visual Route.
1. Launch Visual Route by double clicking on the Mapping icon. Log in using your Service Pro name and password.
2. Select “Schedule my accounts” (fig 5, C). This is located in the upper left hand corner of the screen. Select the route you want to schedule from the list on the left (fig 5, D). You may only select one route at a time.
3. Click on “Select Services” (fig 5, F) and select the appropriate services for the routes you are evaluating. Refer to Appendix A for appropriate service types for each route.
4. Click on “Additional Options” (fig 5, G).
- The Additional Options window will appear (fig 7).
- In the “Service Status” field choose “Active” (fig 7, A).
- When scheduling accounts, select a time frame (fig 7, B).
- Check the box “Only include accounts for whom…in this date range”.
- Click on the arrow in the “From” box. A calendar will appear. Highlight the first day of the month being scheduled.
- Click on the “To” box. Another calendar will appear, highlight the last day of the same month for the same year.
- Click on the “Close” link to close the “Additional options” box.
5. Click on “Create Map” (fig 5, H). The scheduling screen will appear.

This screen has each account plotted.
Every scheduled day is denoted as a different colored and shaped pushpin. Accounts scheduled for the same day will be represented as the same pushpin.
Use this map to group individual accounts on the same day to maximize productivity and minimize drive time between services.
Do not move an account more than 5 days beyond its current date. However, an account can be moved more than 5 days forward if the customer is made aware and has given permission to do so. These customers can be identified by running the “Date Change Report” from the print menu toolbar after you have finished making your changes to the schedule. This report will tell you the customer’s original date along with the new date.
Exception:
Bait monitoring services can only be moved +/- 5 days from their previous schedule date according to current label requirements
6. As changes are made to the daily schedules you can verify that daily productivity standards are met or exceeded by checking route values. This can be done in one of two ways.
Click “Routing” in the tool bar (fig 5, A). From this pull down menu click “Get route values”

This will generate the “Route Values” report that shows stops, dollars, and service measurements for each day, see Appendix B. NOTE: The measurements do not show equivalent square footages for GreenUP landscape services.
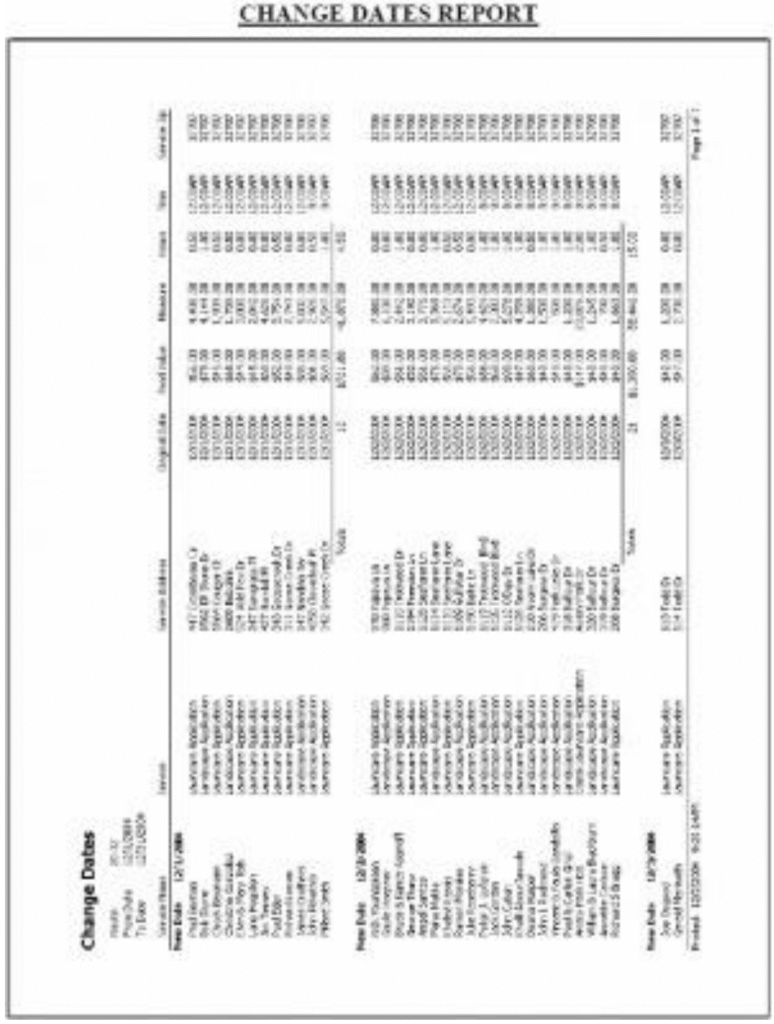
For more detail, click “Print” in the tool bar (fig 5,A). From this pull down menu click “Date Change Report”.

This will generate the “Change Dates Report”, see Appendix C. This report shows stops, dollars, and service measurements for each day. It is in effect a “Production to Do” that is current through the changes made thus far. NOTE: The measurements do not show equivalent square footages for GreenUP landscape services.
7. Once you have scheduled your routes to meet or exceed productivity standards, click on the first day of scheduled work. Then click on the in the toolbar (fig 9, A). This will start the auto-routing process, see figure 10. This process will set up the day in the best order to do the services.

8. After the Auto-router is complete, click “Optimize Stops” (fig 10, D) at the bottom of the screen. This will adjust the order of the stops. Proceed through each day and optimize each day’s work.
9. It is possible to adjust the way the software chooses the route. For example, if the route chosen by the software involves driving on a toll road and you don’t want the Specialist/Technician to use a toll road, you may designate road parameters that influence the software.
10. To adjust the software settings:
- Click “More Options” (fig 10, E) at the bottom of the screen.
- A screen “More Route Options” will appear, see:
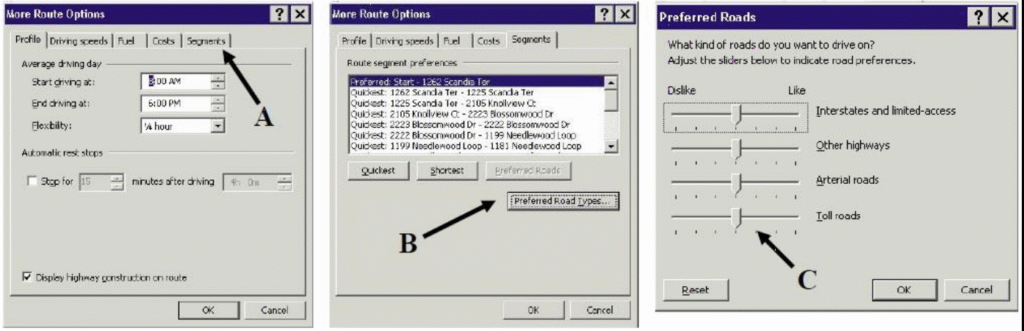
Choose “Segments form the tabs across the top (fig 11, A).
From the next menu click on “Preferred Roads” (fig 11, B).
A new window will appear that allows you to adjust sliders for each road type. The sliders allow you to choose a preference for different road styles. Adjust the slider to dislike any road types that you do not want to use (fig 11, C).
Once complete. Click “Optimize Stops” (fig 10, D) to reroute the day per your road preferences.
Once the optimization is complete, click on the “Change pattern” and “These changes are permanent” boxes and then click “Save Changes” (fig 10, E,F,G). This will save the current set up for the month’s service in the Service Pro database.
When the system is finished saving, click on “Print” in the toolbar (fig 9, A) and select “Export Report”.

A box will appear prompting you to save changes to your customer files in the Service Pro, click “Yes”. This will save the pattern you have set up to the next year’s worth of services. This is a long process and may take 15 minutes to complete.
Helpful Hints #
- Show Stops– Show stops is a function that will allow the user to highlight accounts belonging to a specific day. Select the day you want to highlight and click “Routing” in the toolbar. From this drop down menu select “Show stops”. This will plot all accounts on the selected day as yellow triangles and all other accounts as red squares. To reset, click on “Routing” in the toolbar and select “Reset stops”.

- Scroll Arrow– When you move the navigate arrow to the border of the map, the arrow will enlarge. The enlarged arrow is the scroll arrow. By clicking this arrow, the map will scroll in the direction of the arrow. DO NOT DO THIS. The scroll function will cycle many times, potentially causing the map to scroll well off target. The best method to move outside the map area is to zoom out, select the new area and zoom back in.
- Account ID– by double clicking on a push pin, the accounts information will be displayed. If there is more than one account located at the push pin, a window will open asking you which pin to select. Select your pin and click OK.

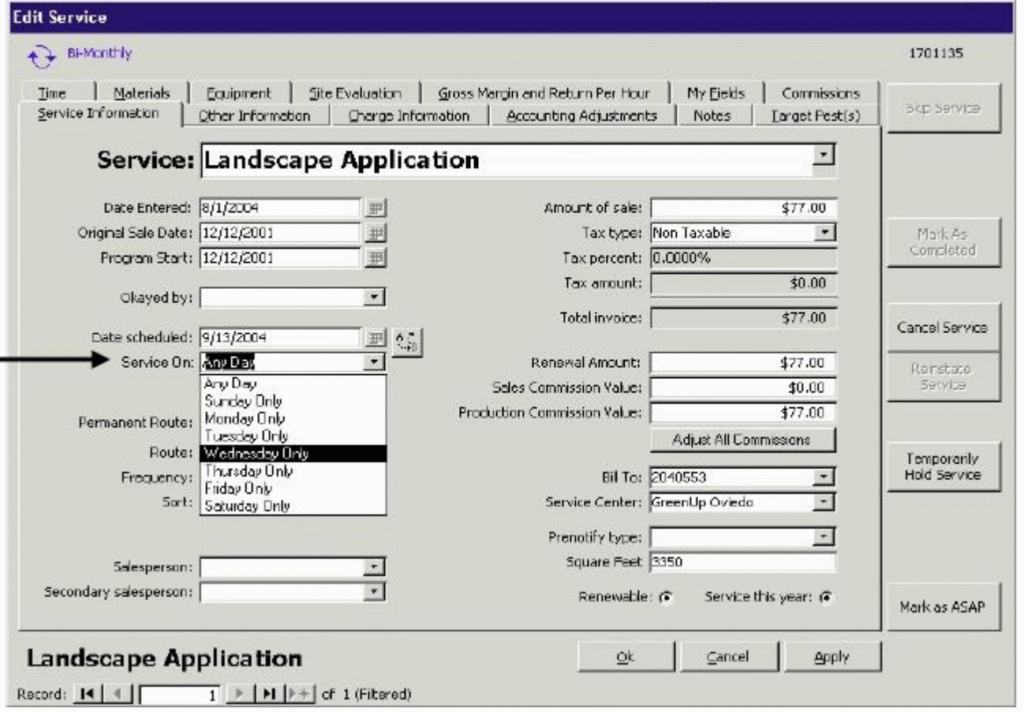
- Hard Date– If you have an account that must always be serviced on a specific day of the week, you can hardcode the account. To do so, bring up the account in Service Pro and open the Services screen. Click on the service you wish to hardcode. Under service day, there is the line “Service on”. Pull down this menu and choose the appropriate option see figure 12.
When this account is plotted by Visual Route, the account will show up as a question mark, see Figure 13. It will not allow the date to be changed.
ASSIGNING THE WORK #
Work is to be assigned daily during check in. By completing the following steps, the Service Manager will be able to efficiently organize and assign each day’s work.
- Twice a week the Customer Service Specialist or Office Manager will print Service Reports in the following manner:
- Tuesday- Service Reports are printed for Wednesday, Thursday and Friday
- Thursday- Service Reports are printed for Saturday, Sunday, Monday and Tuesday
- The Service Reports will be given to the Service Manager.
- At approximately 3:00PM, after the previous day’s work has been posted, the Service Manager will log into Visual Route.
- Proceed to “Schedule my Accounts” and select the first route.
- In “Additional Options”, select the date range of the 1st through the next Saturday’s date. This will bring up all accounts scheduled and not completed through the next Saturday. Also select “Show Requests”. Select the request category for your service type. This will plot all requests that have scheduled dates within the date range chosen.
- Click on “Create Map” This will plot all of the unserviced accounts for the date range requested.
- Any previously unserviced accounts should be rescheduled to the next day if it is logistically possible. If not, assign the account to another day that week. No account should go more than five days beyond the originally scheduled service day. This may require unserviced accounts to be caught up on Saturday. When done, you should have no unserviced accounts scheduled prior to today’s date.
- After you have evaluated and tweaked the next day’s work, Auto-route and optimize that day.
- If the Specialist/Technician is new or unfamiliar with the area, you may print strip maps with directions at this time.
- With the day auto-routed, go to the tool bar and click “File”. From this drop down menu click “Print”. A window will appear. In this window, choose your printer, and “Strip maps”. Then click “OK”.
- After all routes have been evaluated, adjusted and optimized, choose “These are permanent changes”. DO NOT CHOOSE “CHANGE PATTERN”. Then click “Save changes”. This will save only this month’s schedule.
- Print out the Cover Sheets for the next day’s work from the “schedule date wizard” in Service Pro. The optimization process will ensure that the sequence of the stops will be in the best order to perform service.
- When assigning the work to the Specialist/Technician, match up the invoices with the “Daily Worksheet” forms and the strip maps (if printed). This is a complete work packet ready to be assigned during today’s check in.